
Seth Rao
CEO at FirstEigen
10 Essential Steps to Set Up AWS Managed Airflow for Optimized Workflow Management
Harnessing the power of cloud-based workflow management has become indispensable in modern IT environments. Amazon Web Services (AWS) offers Amazon Managed Workflows for Apache Airflow (MWAA), a crucial tool that simplifies complex computational workflows and enables Managed Airflow on AWS.
In 2022, AWS’s revenue surpassed $80 billion, indicating its prominent role in the growing cloud services industry. Additionally, the cloud market is expected to see an annual growth rate of 31% in 2023, marking the rising demand for automated and remote work solutions like Managed Airflow. This guide provides a detailed, step-by-step walkthrough for setting up a Managed Airflow environment on AWS.
Key Takeaways
- Cloud-based workflow management is crucial to orchestrating computational workflows in complex IT environments.
- Having a Managed Airflow environment on AWS is an emerging solution to workflow orchestration challenges.
- This guide provides step-by-step instructions, simplifying the process of deploying Airflow environments for users.
What Is a Managed Airflow Environment in AWS?
A Managed Airflow environment refers to a cloud-based service that automates the setup, scaling, and maintenance of Apache Airflow – an open-source platform for orchestrating complex computational workflows and data processing pipelines. AWS offer Managed Airflow as Amazon Managed Workflows for Apache Airflow (MWAA). MWAA eliminates the need for manual installation and configuration, providing IT professionals with an out-of-the-box solution for deploying Airflow environments.
Apache Airflow enables defining, scheduling, and monitoring workflows through Directed Acyclic Graphs (DAGs). In DAGs, each node represents a task, while edges represent dependencies between tasks. Airflow’s flexibility enables integration with numerous data sources and processing tools, making it a staple for data management processes like extract-transform-load (ETL) and machine learning pipelines.
Amazon MWAA integrates seamlessly with other AWS services and automatically scales resources based on variable workload demands. This auto-scaling feature is essential in growing business IT environments with unpredictable resource needs. MWAA also comes with effective monitoring and logging features through integration with Amazon CloudWatch. Additionally, MWAA handles software patching and updates, allowing IT professionals to focus on building workflows rather than routine infrastructure management.
Setting Up Managed Airflow on Your AWS Account
Setting up a Managed Airflow environment on AWS requires a combination of AWS services coordinating with Amazon Managed Workflows for Apache Airflow (MWAA). Managed Airflow offers users a hassle-free way to implement, scale, and manage Apache Airflow environments. Apache Airflow is an open-source platform that allows IT teams to author, schedule, and monitor workflows programmatically.
By following these 10 steps, you can set up a Managed Airflow environment on AWS, enabling scalability, easy maintenance, and orchestration for complex workflows in your IT environment.
Step #1: Gather Prerequisites
There are three prerequisites for this process:
- AWS Account: You must have an AWS account.
- Permissions: Your AWS Identity and Access Management (IAM) user must have the necessary permissions to create and manage MWAA environments and their related resources.
- AWS Command Line Interface (CLI): Installing the AWS CLI installed for command-line operations greatly simplifies the process.
Step #2: Set Up an Amazon S3 Bucket
Apache Airflow requires a DAG repository, and most IT organizations use Amazon S3 for this purpose. Navigate to the S3 console in AWS and create a new bucket. Note the bucket name, as you will need it for setting up the Airflow environment.
Step #3: Create an IAM Role for MWAA
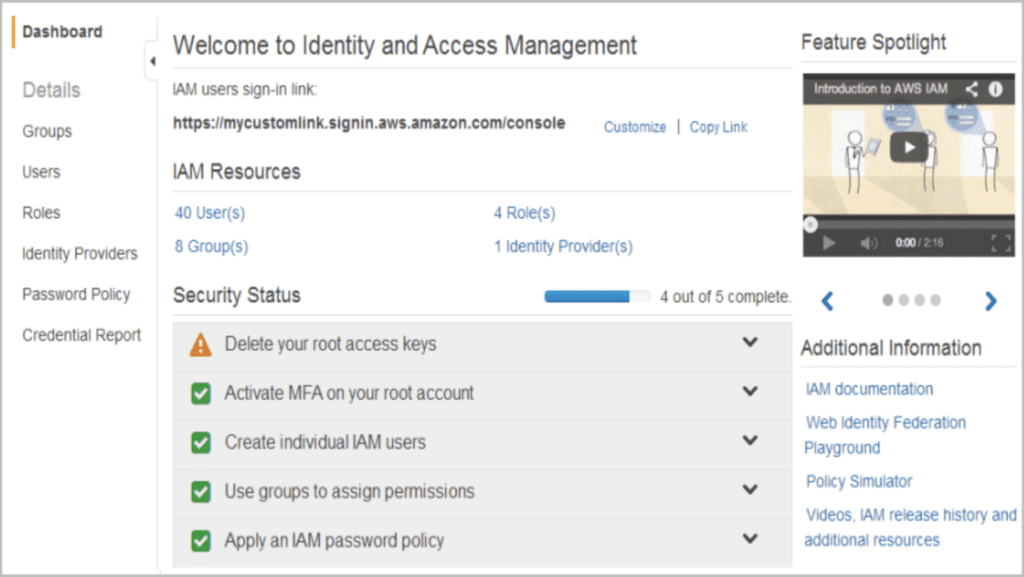
Navigate to the IAM console and create a new role. Set MWAA as the AWS service and attach the `AmazonMWAAFullAccess` policy. Note the Role ARN for later use.
Step #4: Configure the Virtual Private Cloud (VPC) and Security Groups
MWAA operates with a Virtual Private Cloud (VPC). You can either use an existing VPC or create a new one. On your VPC, create two private subnets. Then, configure security groups to allow necessary traffic. For example, allow outbound traffic for MWAA instances to download Python dependencies.
Step #5: Create the Managed Airflow Environment
Now comes the core task of this process. Navigate to the MWAA console and click on “Create Environment.” Then follow these seven sub-steps:
- Choose an environment name and select which Airflow version you want to use.
- Under the DAG code in S3 section, enter the S3 bucket name you chose earlier.
- For “Execution Role,” enter the IAM role ARN you created earlier.
- Under the Network configuration, choose the VPC, subnets, and security groups.
- Configure environment class, logging levels, and any custom Airflow configurations you require.
- If necessary, configure plugins, requirements, and source code options.
- Click on “Create environment.”
Step #6: Access the Airflow Web UI
After creating the environment, navigate to the MWAA console, select your environment, and click on the “Access Airflow UI” link. Then, log in using IAM credentials or take an IAM role that has access to the Airflow environment.
Step #7: Upload DAGs to S3
Create your Airflow DAG files and upload them to the S3 bucket you set earlier as the DAG repository. This will cause your DAGs to be visible in the Airflow Web UI.
Step #8: Monitoring and Logging
Configure Amazon CloudWatch to monitor your environment and record log data, metrics, and alarms. You can then apply any necessary alarms and notifications for resource utilization or failed tasks.
Step #9: Scaling and Maintenance
As workloads will have varying resource needs, regularly review your environment’s performance and scale the resources accordingly. Ensure that you keep Airflow updated and perform routine maintenance when needed.
Step #10: Cost Management
Like other AWS resource allocators, Managed Airflow can begin to throttle resources without regular monitoring. Schedule regular checks of your AWS billing dashboard and consider using AWS Budgets to set limits and alerts.
Explore Unified Data Observability Solutions with FirstEigen
FirstEigen’s DataBuck goes beyond traditional data warehouse monitoring, leveraging AI/ML to autonomously observe your data lake, warehouse, and pipeline for errors, ensuring reliability at each stage of your data journey.
Contact FirstEigen today to learn how DataBuck can improve the data quality of your cloud data!
Check out these articles on Data Trustability, Observability & Data Quality Management-
FAQ
AWS Managed Airflow, also known as Amazon MWAA (Managed Workflows for Apache Airflow), is a service that allows users to run and manage Apache Airflow on AWS without handling the underlying infrastructure. It simplifies workflow orchestration on the cloud.
Discover How Fortune 500 Companies Use DataBuck to Cut Data Validation Costs by 50%
![]()
Enter your email address to access to downloads
Recent Posts

The Power of Data Quality for AI Success
AI agents are only as reliable as the data they act on. As enterprises race to deploy AI, data quality has quietly become the deciding factor between success and costly failure. The Problem Nobody Is Solving Most AI conversations…
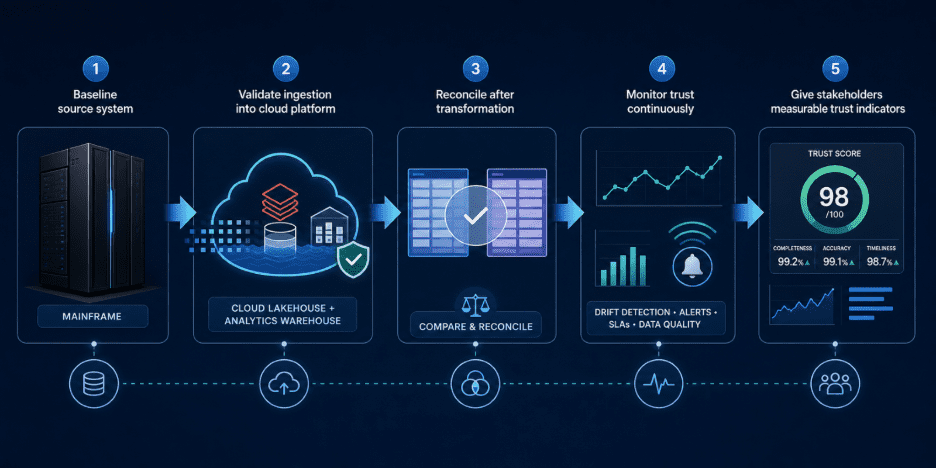
Mainframe Data Reconciliation for Cloud Migration
Cloud migration is no longer just an infrastructure decision. For data leaders and data engineers, it is a trust decision. …

What Do Failed AI Projects Have in Common?
Most AI failures are not model failures — they are data, governance, operational trust, and weak AI-ready foundations. “AI alone is not the solution – trusted, validated, continuously governed data is the…
Bad Data Is Costing You More Than You Think